Did You Know? There are several billions of people using email globally estimates show email users could exceed 4.7 billion by 2026. An email signature is not a sign-off, but an effective means of displaying your identity, establishing trustworthiness, and leaving a lasting impression with each email. In commerce, a mature signature inherently builds credibility and displays diligence.

Whether you’re an entrepreneur, a student, or a freelancer, a Gmail signature makes normal emails become branded communications. It allows easy identification of who you are, what you do, and how to contact you.
In this guide, we take you through it all, from how to make your Gmail signature step by step on computer and phone to design tips, how to sort out common problems, and expert settings so that a signature can really be made unique.
- What is a Gmail Signature?
- Why Add a Signature in Gmail? (Key Benefits)
- How to Add a Signature in Gmail (Desktop/Web)
- How to Add a Signature in Gmail
- Tips for Creating a Professional Gmail Signature
- Common Issues & Solutions
- Gmail Signature Advanced Options
- Best Features to Add in Your Gmail Signature
- Final Thoughts
- FAQs
What is a Gmail Signature?
A Gmail signature is a customized piece of copy (and sometimes images or links) which automatically gets appended at the footer of your emails. Your virtual business card, it contains crucial information such as:
- Your name
- Job title
- Company name
- Contact information (phone, site, social media)
- Optional features like banners, disclaimers, or call-to-actions (CTAs)
Once well-designed, a signature not only makes your emails professional but is also a subtle marketing tool.
Why Add a Signature in Gmail? (Key Benefits)
You probably don’t even know what an email signature can do. Here’s why you really can’t do without it:
1. Professional Impression
Email signatures appear professional and authoritative. They demonstrate that you’re professional, leaving a lasting impression on customers, co-workers, and leads.
2. Brand Consistency
Your Gmail signature can include your brand identity logo, color palette, and slogan in the case of a business. It creates awareness and reminds of credibility.
3. Mini-Marketing Platform
Your signature can include your website link, portfolio, or ongoing promotions. Leverage it as a passive promotional area that functions automatically without further effort.
4. Increases Engagement
Placing clickable CTAs such as “Book a demo,” “Follow us on LinkedIn,” or “Read our blog” is a great way to influence people to do the next thing. It is simple for the recipient to do the next thing.
5. Extends Social Media Reach
Placing social icons is making it simpler for recipients to follow you on social media sites such as LinkedIn, Instagram, or Twitter.
How to Add a Signature in Gmail (Desktop/Web)
The Gmail web program is where you will get full signature setting choices. The steps are as follows:
Step 1: Open Gmail Settings
- Log in to your Gmail account through a browser.
- Tap on the gear icon (⚙) on the top-right.
- Click “See all settings.”
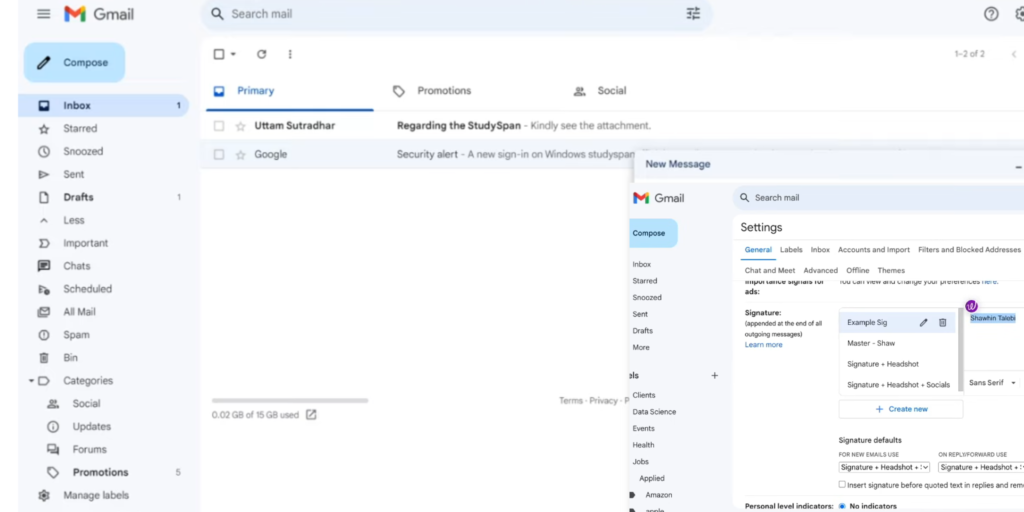
Step 2: Navigate to Signature Section
- Under the Settings menu, click the “General” tab.
- Scroll down to find the “Signature” section.
- Tap “Create New.”
Step 3: Add Your Signature Details
- In the text area, enter in the information you’d like to display:
- Full Name
- Job Title
- Company Name
- Contact Information (phone number, e-mail address, website)
Example
John Doe | Marketing Manager
XYZ Company
+1 (555) 123-4567
www.xyzcompany.com
Step 4: Customize Your Gmail Signature
- This is where you get your text nice and pretty-looking.
You can:
- Adjust fonts (Sans serif, Serif, etc.)
- Change font size (Small, Normal, Large, Huge)
- Apply colors to text for brand consistency
- Insert hyperlinks (e.g., link your website, LinkedIn, or phone number)
- Upload images/logos (recommended for brand consistency)
Step 5: Set Default Signature & Save
- Below the editor, you’ll see signature defaults.
- Choose which signature to use for new emails and replies/forwards.
- Click “Save changes” at the bottom.
Quick Link: McAfee Scam Email: How to Stay Safe from Scammers
How to Add a Signature in Gmail
Signatures within the Gmail app (Android & iOS) are simple and text-only.
On Android

- Open the Gmail app on your phone.
- Tap the three-line menu (☰) at the top-left.
- Scroll down → Tap Settings.
- Select the email account you wish to modify.
- Tap Mobile Signature.
- Type in your text-only signature → Tap OK to save.
On iPhone (iOS)

- Launch the Gmail app.
- Click the hamburger menu (☰) at the top left.
- Scroll down → Select Settings.
- Select your account → Tap Signature settings.
- Flip “Mobile Signature” to On.
- Type your text signature → Tap Done.
The Gmail app will not allow logos, images, and advanced formatting. If you desire a more robust appearance, type on the web interface or a signature generator web site.
Tips for Creating a Professional Gmail Signature
Design is important. Here is how to get your Gmail signature clean, professional, and effective:
- Keep it simple: Avoid loading too much unnecessary stuff.
- Prioritize key info: Name, title, phone number, and a couple of links.
- Be consistent with fonts & colors: Reference brand guidelines.
- Add company logo or headshot: Builds trust and recognition.
- Include clickable elements: Links, CTAs, or social icons.
- Avoid clutter: Too many images or links is spammy.
- Optimize for mobile: Ensure that design is readable on small screens.
Common Issues & Solutions
Even after setting up, you may encounter issues. Here’s how you can fix them:
Signature not showing? Check “Signature defaults” and ensure it’s enabled for your email.
- Images missing? Use images rather than linking from private servers. Size <1MB.
- Unusual formatting or extra characters? Use “Remove Formatting” in the editor. Use only email-safe fonts.
- Signatures different on mobile phones? Remember Gmail mobile apps don’t support plain text signatures alone.
Gmail Signature Advanced Options
Need more than plain text and links? Make use of the following:
- HTML Signatures: Design your own signatures using HTML code to manage styling.
- Multiple Signatures: With Gmail, you can have multiple signatures for various situations (e.g., formal and informal).
- Email Signature Generators: WiseStamp, HubSpot, or MySignature are some of the tools where you can create professional, branded signatures with banners, disclaimers, and social icons.
- Company-Wide Signatures: Companies can implement standard branded signatures on all employees using Google Workspace or signature management software.
Best Features to Add in Your Gmail Signature
To make your signature stand out, consider adding:
- Company logo or headshot
- Social media buttons
- Call-to-action (CTA) button (e.g., “Book a Call”)
- Banner for promotion, product, or event
- Legal disclaimer (if needed)
- Inspirational personal quote or personal slogan
Final Thoughts
Adding a Gmail signature is one of the simplest ways to add more to your communication. Whether sending emails for personal or business use, a signature enhances professionalism, brands you, and builds engagement. Take a few minutes today to configure your Gmail signature. Keep it short, mobile-optimize, and be sure to test it by sending yourself a test email.
Every email you send presents an opportunity to make an impression. Make it count.
Check out our Digital Marketing Page, for more expert tips and guides. If you’d like to work in AI and SEO, submit your guest post and Write for Us.
FAQs
How do I set a signature on Gmail?
Open Gmail on the web, click the Settings gear icon, choose “See all settings,” scroll to the Signature section, create a new signature, add your details, and save the changes.
How do I make my own email signature?
Write your name, job title, company name, and contact information. You can also add a logo, social media links, or a call-to-action, keeping it clean, professional, and mobile-friendly.
How do I make my email signature appear automatically?
Go to Settings → Signature Defaults, select your signature for new emails and replies/forwards, and then save the changes.